
As the Internet continues to dominate an increasing percent of our media consumption, it’s no surprise that clients almost always want a version of their video project created for web playback. In this post we’ll explore a simple way to create video optimized for YouTube using Final Cut Pro.
There are countless software and hardware options that can be used to create video for web, and an equally large number of video format, file type and codec choices. Luckily, Final Cut Pro includes simple tools to create video in one of the most common web formats, QuickTime. Quicktime video can easily be uploaded to video sharing sites like YouTube or Vimeo.
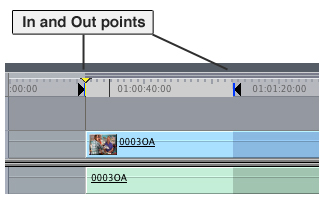
Open up your active timeline.As good practice, it’s almost always a smart idea to place in and out points at the start and end of the media you intend to export. This can be done by scrolling the play-head to the in point-and using the shortcut “I”. Now scroll to your out point and use the shortcut “O”. You will now see the In and Out points marked above the timeline. Now, the only portion that will be exported is the media that falls between these points.
Render the area between the in and out points by using the shortcut COMMAND+R.
Once rendered, navigate to the Menu Bar and choose File > Export > Quicktime Conversion.
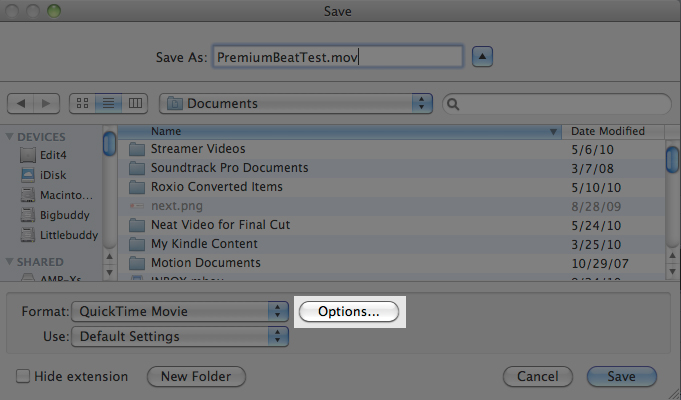
Choose a file name for your exported video and a destination where it will be saved.
Default settings give us a jumping off point, but we will want to make a few tweaks to the encoding variables…
Exporting for YouTube from Final Cut Pro
With the development of consumer HD video cameras, the support of HD on YouTube has also improved greatly over the last few years. YouTube now supports a wide range of video resolutions and file formats. This export method from Final Cut Pro will insure your video is taken into YouTube at a high resolution and frame size.
In the Save dialogue box (step 6 from above) set the Format to” Quicktime Movie” and Use to “Default Settings” (these are the standard settings in FCP). Click “Options”
The Movie Settings dialogue box will appear. Click Video Settings and set the compression to H.264. The H.264 codec delivers a high quality looking image with a relatively small file size… it’s also very YouTube friendly.
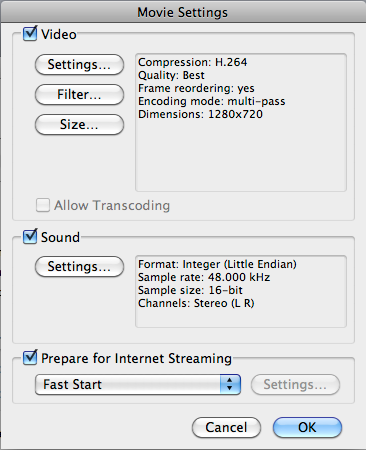
The goal here is to keep your encoded video as close to the original settings as possible. With this in mind you will set the Video settings as follows:
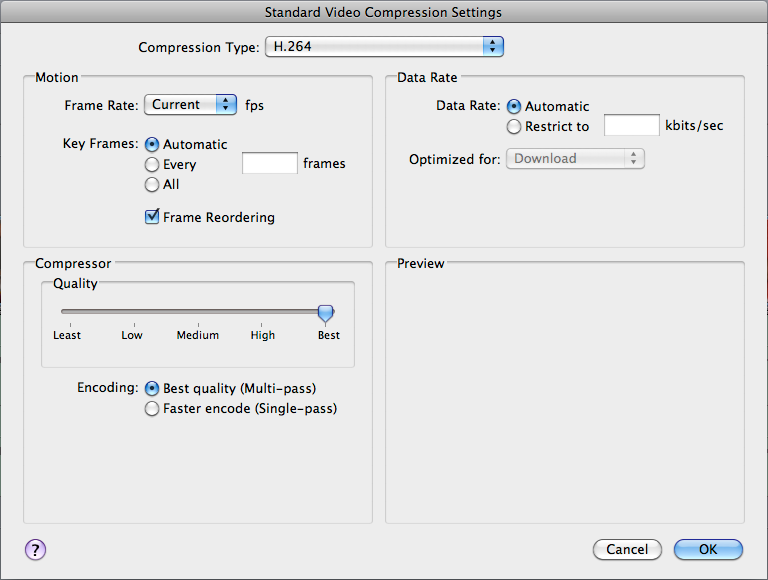
• Set the Frame Rate to Current
• Set the Data Rate to Automatic
• Set the Compressor Quality to Best
• Set the Encoding to Best Quality
Click “OK” and then click on the Size button.
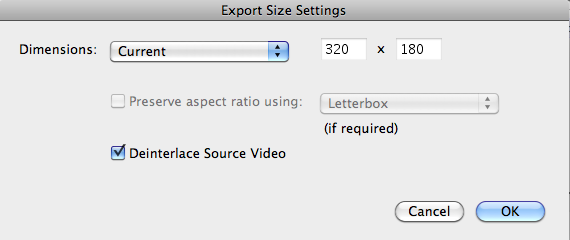
Set the size to “Current”. We should note that YouTube prefers either 1280 x 720 or 1920 x 1080for HD video and 640 x 480 for SD video. However, setting to “Current” will insure the video will be exported at it’s highest available resolution.
Click “OK” and when you return to the Save dialogue box hit “OK” again to export!
Hope you people like this useful information:)
Tutorial By: Danny Greer
0 comments:
Post a Comment
Your precious comments/critics will help this site improve