Showing posts with label Final Gather. Show all posts

Motiva COLIMO 1.2! Fast Overview


Motiva COLIMO, a realtime postproduction tool that allows change materials over prerendered images,
taking in account physical accurate reflections, refractions and GI bleeding.


 CHANGES FROM PREVIOUS (1.1!) VERSION:

 - Thea render integrated workflow support.
 - Image sequence support.
 - New fle format that allows easier connection to third party software.
 - InteliThread upgraded that makes user experience smoother and allows faster changes over the colors and textures.
 - Better texture fltering.
 - Color picker is now applied to the objects in realtime.
 - Better lights support.
 - Improved viewport control.
 - Supersampling feature.
 - Alpha support on saving.
 - Better memory footprint.
 - Faster project loading.
 - Faster viewport resizing.
 - Samples included.
 - Jpg quality selector on export to web.
 - New versions of Max2Colimo and Modo2Colimo.
 - Minor bugs fxed...

More Info...
 Link : http://www.motivacg.com/forum/viewtopic.php?f=3&t=172
 Link : http://www.motivacg.com/
 Vimeo Link : http://vimeo.com/motiva


View Details

Fast Rendering of Visualizations with Lumion (TM)

Stunning visualizations in seconds! Lumion uses real-time 3D technology for rendering.This amazing technology of Lumion renders images in a fraction of a second. The aim of of the software is to create a lightning fast workflow between packages like Autocad or Sketchup and stunning visualizations.


Lumion uses real-time 3D technology for rendering.
This amazing technology of Lumion renders images in a fraction of a second.
Stunning visualizations in secondsLumion uses real-time 3D technology for rendering. This amazing technology of Lumion renders images in afraction of a second.


Lumion offers what architects could only dream about for years!
If you are an Architect or 3D artist you will be pleased to discover what you can achieve with Lumion.Visualization software should not feel like an extra job, it should just be there for you when you need it and it needs to deliver results without effort.We provided Lumion with a user interface that is designed around you.
Complex tasks look easy with Lumion. The most important goal of Lumion is to let you do jobs yourself which usually require expensive specialists. That is amazing by itself but on top of that Lumion renders in real-time, meaning you can view the end result instantly.
Lumion supports models created in Sketch-up, 3DS Max, Maya and most other 3D design software. You can run Lumion next to your existing software. Just fire it up and have an image or movie of your work in 5 minutes.


A different kind of software
Lumion redefines how you use software. Regardless of the difficulty of the task at hand Lumion makes it feel easy. Extensive user testing combined with GPU technology was used to create a new level of usability.
The graphics engine is designed for instant visualization. Just import your models and Lumion makes them look good. No effort. No waiting. Lumion’s “theater mode“ allows you to us it as a 3D viewer for easy flytroughs of complex 3D models in real-time.
Lumion includes a stunning arsenal of high quality content. A huge library of plants, trees, people, cars, animals, landscapes, buildings, materials and more provides you with everything you need to make movies and images stand out.


Materials and lights
Lumion comes with a extensive material library to quickly provide your models with realistic appearances. Need changes in your model? Update your model with a single click in Lumion and all materials are automatically applied to the updated model.


Lumion materials combine perfectly with the sophisticated lighting system. This system simulates daylight, fog and sky color. Creating good looking images was never this easy.


Recommended System
Windows XP, Windows Vista or Windows 7
2GB system memory
1GB Graphics memory
NVIDIA GeForce 260 or equal performing 3D card
Supported file formats
Textures: BMP, DDS, PSD, PNG, TGA
Models: MAX(Requires 3DS Max installation), DAE, FAB,
FBX, OBJ, 3DS, DXF
Most tools such as Sketch-up and Maya allow exporting to one of these formats
Supported output format
MP4, BMP, JPG


Included content
Lumion includes a very large library of materials, people, animals, trees, plants, buildings, street furniture, landscapes, cars, boats, roads and more.


Tutorials and Demo Version can be found on Lumion Website
View Details

3ds MAX + VRay Tutorial :: Time is running

What is V-ray ? This beginner tutorial explains about this plugin and how its different settings gives us realistic results when installed in 3dsmax. to understand the different materials and lights are used you could try this tutorial yourself.

This 3ds Max Tutorial is by CG artist, Jan K. Vollmer.

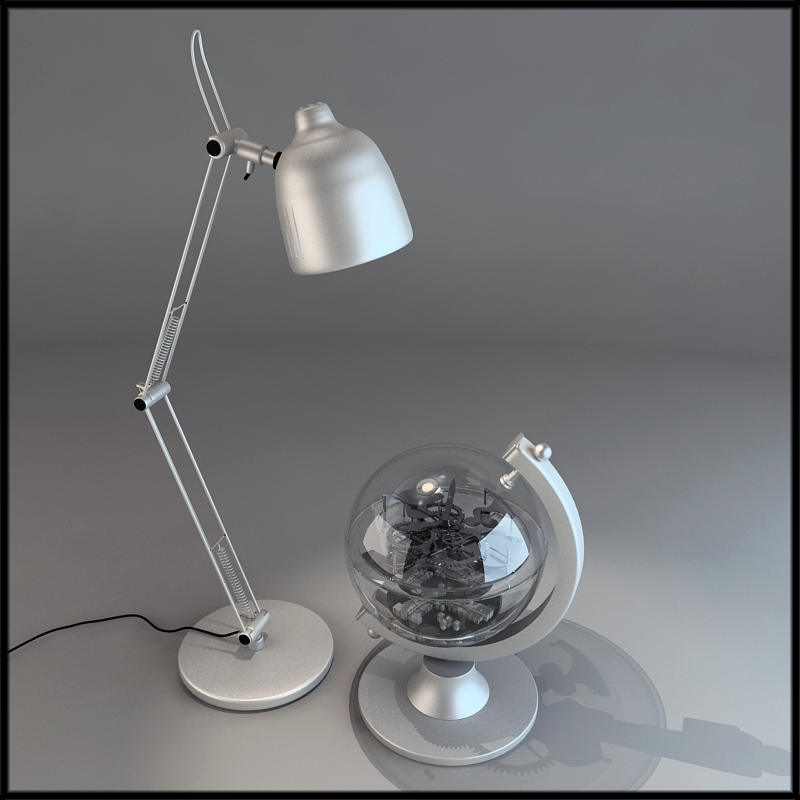
In this tutorial I want to show the making of the image “time is running” made with 3ds max 2008, rendered with vray 1.50.SP1.


Everything is modelled in 3ds max 2008 mostly from standard geometry and some splines with lathe like the lampshade. Modelling is not my favourite so I want to show the material and the scene and rendering setup with vray 1.5.SP1.

First of all I build some kind of a studio surrounding with making a concave fillet and bend it a little to get a fourth of a cycle. So get enough studio walls around the objects. Be sure to make it big enough.

Then I start the modelling. Everything was made from standard forms in max and nothing special. I almost did not use textures, because I wanted to create real metal materials and silver effects. Just the little factory inside has textures like the ground and some buildings.


Wire of the whole Scene


Close-up of the clockwork


Close-up of the Lamp

The next step is to set up the materials for the different metal objects, the glass and the factory. I used the standard vray advanced materials and modified them for the five Basic materials in my scene.


The chromium material:
A standard vray material with a light gray colour in the reflection, refl. Gloss of .71, subdivision of 12 to get nice results but still short render time. The IOR is at 2.97 and I used ward.

The glass material:
In the reflection slot is a falloff map set to standard and fresnel. Ref. Gloss. Is set to .98, IOR is at 1.517 and set the affect shadow and alpha to get nice shadows on the ground. The fog colour is set to white.


The light material:
Just a simple vray light material that is set to a warm light orange colour and with a multiply of 6 to get a bright effect. Instead of a real bulb I used a sphere with the light material applied to get the light emission.
The hdri reflection map:

This is a map I use very often for interior scenes. I set the overall multi. to 3.0, made a spherical environment and a vertical rotation of 75 deg. To get the ground of the map really on the ground, I put that map in the environment reflection slot in the vray over right slot.

The silver material :
Silver material is very similar to the chromium; it has just a much brighter reflection colour and a almost black diffuse. I also set the refl. Gloss. to .95 for high reflections. The IOR is at .18 for silver.


The light material and HDRI Map

The next is the light set up of my studio. I put two vray plane lights in the scene, one from the right hand side with a blue colour and a multiplier of 5, set it to invisible and the subdiv to 25. The second light I set on the left hand side of the objects to have some light from the opposite side. Here i used a warm colour and a multiplier of 2 to get a soft back light. Subdivs are also at 28. in the vray light properties i set up the diffuse subdivs to 1500 for all lights in the scene to get a nice soft diffuse effect.


The studio lighting setup


Check the VRay Lights Setting Below


Rendering setup For Scene

I made some standard setups like switch of the default lights and hidden lights.I used adaptive subdivision for faster renderings and catmull-rom for sharp edges. For the environment I used a warm colour and the hdri reflection map with the multiplier of 1.For more contrast I set the colour mapping to hsv exponential with the dark multiplier of .5 and the bright to 2.0.
Be shure to switch sub-pixel mapping on to reduce the highlight sparcel effect in the bright colours. The same for clamp output and affect background.


The render setup part1

Before I finally render the image I do some test renderings with low adjustments like ir-map to low and light cache to 100. If everything is like I want it, I push up the settings to custom for the ir-map and a higher light cache of 500 and a sample of .005m. The vray render region is set to 32 for exact rendering. Also set the low threat priority for better performance. I used distributed rendering to render much faster and skip the waiting time. Here is a small intro:

Install on all slaves the vray render node for distributed rendering and set the ip address of the master as render host. Start the vray spawner for distributed rendering. Make sure that the mappings and textures you are using are locates on a server were all the slaves have a connection to. It all so has to be the same device letter like on the master machine (Z:\3dsmax2008\mapingfolder\...) If you have the option “check for missing files” switched on, vray is looking on every slave for the connection and will tell you if anything is wrong. To check for the files I use the asset tracking function in max to relocate the missing files.

And below is the render setup part 2 , and 3


The Final Image


I hope you find this “making of” interesting and you get some help or inspiration from here. All the best and thanks for reading!

Author: Jan K. Vollmer
Website: www.jankvollmer.de

Email: jkv@elberfeld.de
View Details

Beginner Modelling Tutorial 3dsmax

Basic Modelling Techniques for new learners explaining how to create a model using the basic tools to get professional models
View Details

Creating a Pontiac Trans am - 3dsmax


Tutorial explaining the modelling , painting, lightning and rendering process of a Pointiac Trans am.

View Details

Old House Architecture Photograph, Bahrain

Old Traditional house now demolished, This unique picture was taken by Mr.Khan, a famous Bahraini photographer who captured the Tradition and Culture of Bahrain which is now history. inspired by this photo a 3d model was made which is worth sharing.
View Details

Architectural Visualization Riffa Palace Concept

Inspired by the Architectural Design elements of the Riffa Clock Tower, Bahrain. i wanted to do something which had a more royal look, as i started to play with the design elements and keeping a big palace/castle in mind this is where i reached. 3dsmax 9 was used for modeling, rendered in mental ray, with global illumination and final gather on. Design process took 40 hours approx with test renders.
View Details

3d Design Concept Riffa Palace

A Concept derived from the Riffa Clock tower, Bahrain. The idea was to create something massive, royal having the same arab feel.
View Details

Restaurant Interior Design 3dsmax

Details of 3d Materials, Architectural Materials were used. For lights i used Mental ray with a spotlight as sun and a omni in the center of the scene, since the sunlight was not enough to illuminate the center of the restaurant. The render of this single frame took 45 minutes on a P4-2 gigs of ram. Here i used Mental ray with final gather, global illumination "ON" final gather with the value of 500 and for bounce lights the value of 1. Click here to see a different render of this scene, for any questions about the settings of this lighting solution please contact me.
View Details

Good Example of 3dsmax Architechtural Materials

Study of Reflective Materials in 3dsmax, a friendly project for my friend Mr.Vaya who deals in the trading of such counters. My job here was to show the layout of these buffet counters and their placement in the restaurant, here i got a chance to play with the textures/materials/surfaces of the objects in the 3d scene, i really didnt do much for the walls/floor/ceiling. i focused more on the buffet counters which had materials like :
View Details

Bahrain Windtower Final Architechtural Visualization

 Bird's eye view of a Bahraini Traditional House with wind towers. Modelled in 3dsMax9, Rendered with Mental ray with Final Gather on,
View Details

Architechtural Visualization Bahraini Traditional House

Test renders of a Bahraini Traditional house which also has a wind tower. Being inspired by the Bahraini architechture i wished to see the details of the house's design, feel the textures of the sea stone walls, the wood used in doors and windows and wanted to witness the shades, sunlight and sunset of this old traditional house.
 I did that! all the time i was modelling and detailing this house was a experience not less than being here, check out more posts of this fine art.
View Details

Architechtural Visualization 3dsmax 2

Daylight global illumination inside the building in 3dsmax. Showing different perspectives of a building interior with detailed textures on the objects.

Many things count in making a 3d model look realistic like the lights, the effect of lights on different materials/textures, the light bounce from object/materials.
View Details

Architechtural Visualization 3dsmax 1

Architechtural Visualization of Enaaya Art Gallery, Apart from the interior, exterior renders are sometimes more important because they determine the business location around the building. In this render my primary focus was to show how the effect of daylight would be on the building's interior, and global illumination created by sunlight. As in the cafe here people can enjoy the soft sunlight with a coffee and an artistic environment.
View Details

3d interior of Enaya Art gallery


A 3d interior view of the gallery, here i tried to focus best on how the actual gallery will look after construction, giving it textures and details on the materials like the floor , lights and the layout of paintings on the wall, i used 3ds max 2009 and mental ray to render the illumination in this 3d scene
View Details

3d Wallpaper of Enanya Art Gallery


A wallpaper which shows a study glass reflection, refraction, lights and shadows. I wanted to create something artistic with the logo, probably something nice to use as a wallpaper.
View Details
Related Posts with Thumbnails

Inspirations

Total Pageviews

Followers


Sultan Yaqub Copyright © 2009 Sultan Yaqub